How to Build and Deploy a Lyrics Generation Model — Framework Agnostic

You’ll find tons of article about how to build a machine learning model. You’ll find a bit less article on how to consume it intelligently. And you’ll find almost no article about how to serve it from scratch.
- RapLyrics-Scraper
- RapLyrics-Back (closed source)
- RapLyrics-Front (closed source)
What ?
With a good friend of mine we really love to listen to rap music. Rap music is powerful because it has the power of creating savage punchline with only a few words. Since it is still hard to generate long texts with RNN, we believed rap music was a great candidate.
How ?
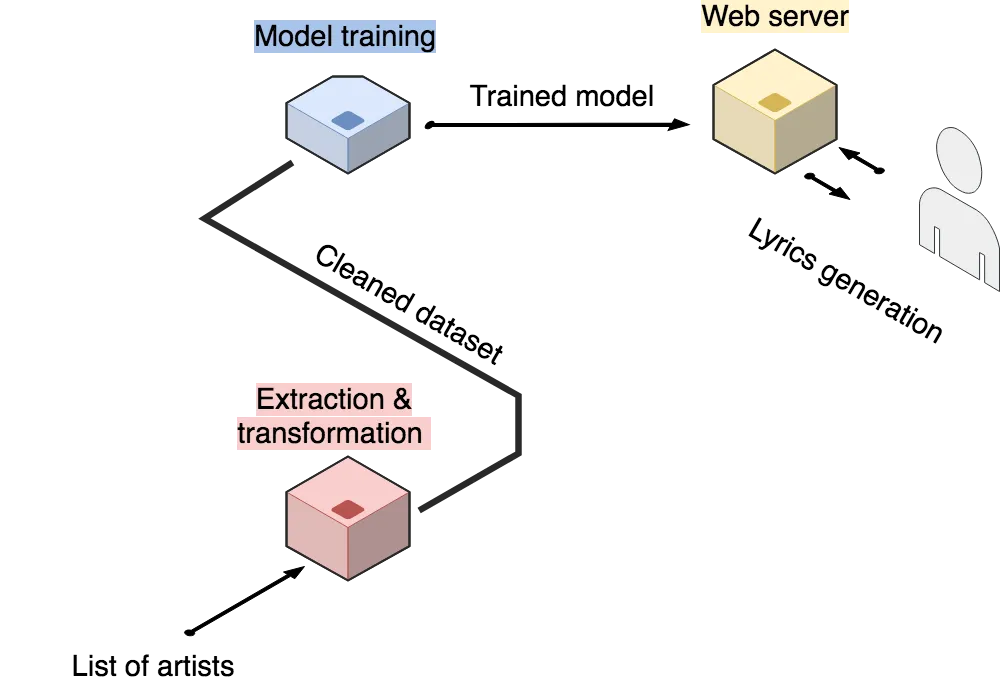
The big picture
I won’t be too descriptive about implementation in the post since we tried to be exhaustive
inside the code repositories, see READMEs. I will insist on the tipping points that
were
challenging for us.
Basic sysadmin knowledge and unix proficiency will help.
1- Data Extraction and processing
GitHub repository: RapLyrics-Scraper
— scraping
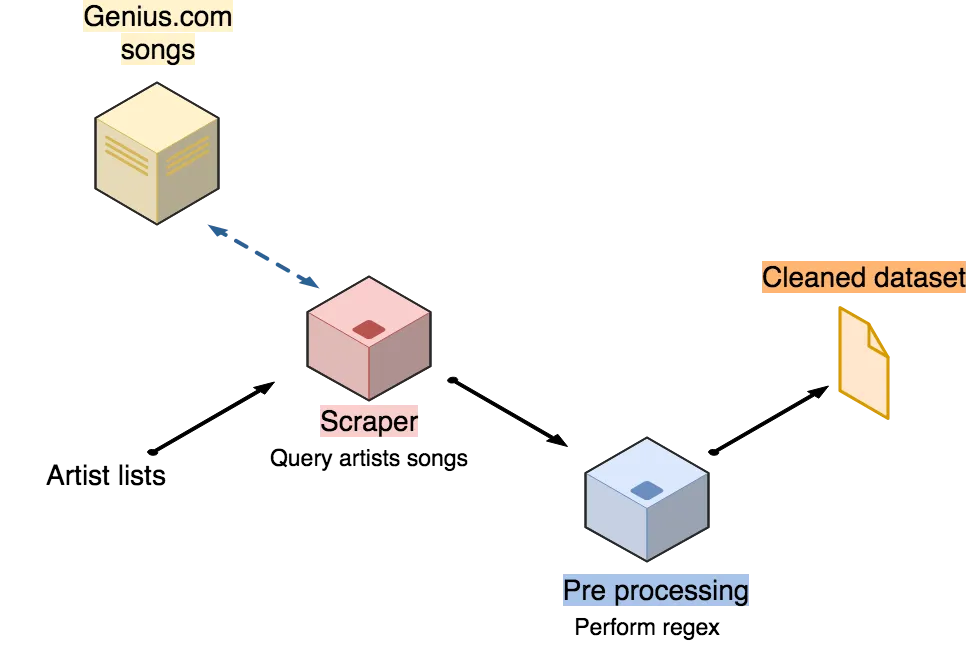
First, we need a dataset to train our neural network.
Luckily enough Genius.com has tons of lyrics available online
and even a nice API.
It may not be designed to scrap lyrics but with some workarounds we managed to build a lyrics
scraper on top of it.
Check the source code or reach out in comments if you need technical details.
After multiple shots, we realized that it’s really important to focus on a high-quality dataset
for natural language processing. We decided to focus on the 60 most popular songs of 40 US
artists.
✔ That’s it for the scrapping.
— pre-processing
.txt dataset. We now have to clean it — i.e.
remove non
lyrical content: ©, ®, Credits, typos and various spellings of the same word. Think about
gettin', getting and stuff like this.
Methodology we followed:
- Identify patterns to eliminate
- Craft regex catching those patterns — resource for regex testing: pythex.org
- Use a text editor to perform those regexes directly on the dataset
— augmenting the dataset
[optional]📖 Data augmentation means increasing the number of data points. In our context, it means increasing the number of sentences.We copied our dataset, shuffled all the verses and pasted this back at the end of the original dataset.
You can find a snippet on how to shuffle paragraphs here.With this trick we double the size of our dataset. This will have a positive impact on the training of the neural networks. Indeed, each new batch is different due to the shuffling, so the network weights are updated with different inputs.
✔ That’s it for the data augmentation.
2- Building a lyrics generative model
GitHub repository: RapLyrics-Back
— dimensioning the text generative model
READMEs
The purpose of this article is not to deep-dive into neural networks design. The implementation
won’t be detailed. You can check in the source code or ping us in the comments.
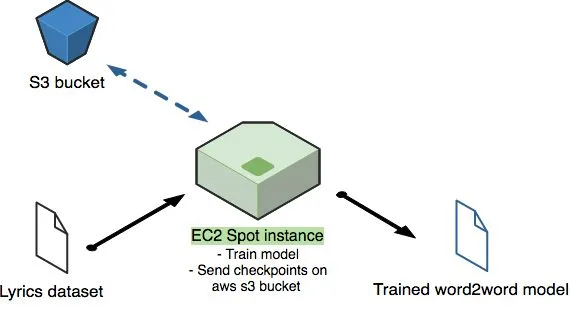
— training the text generative model
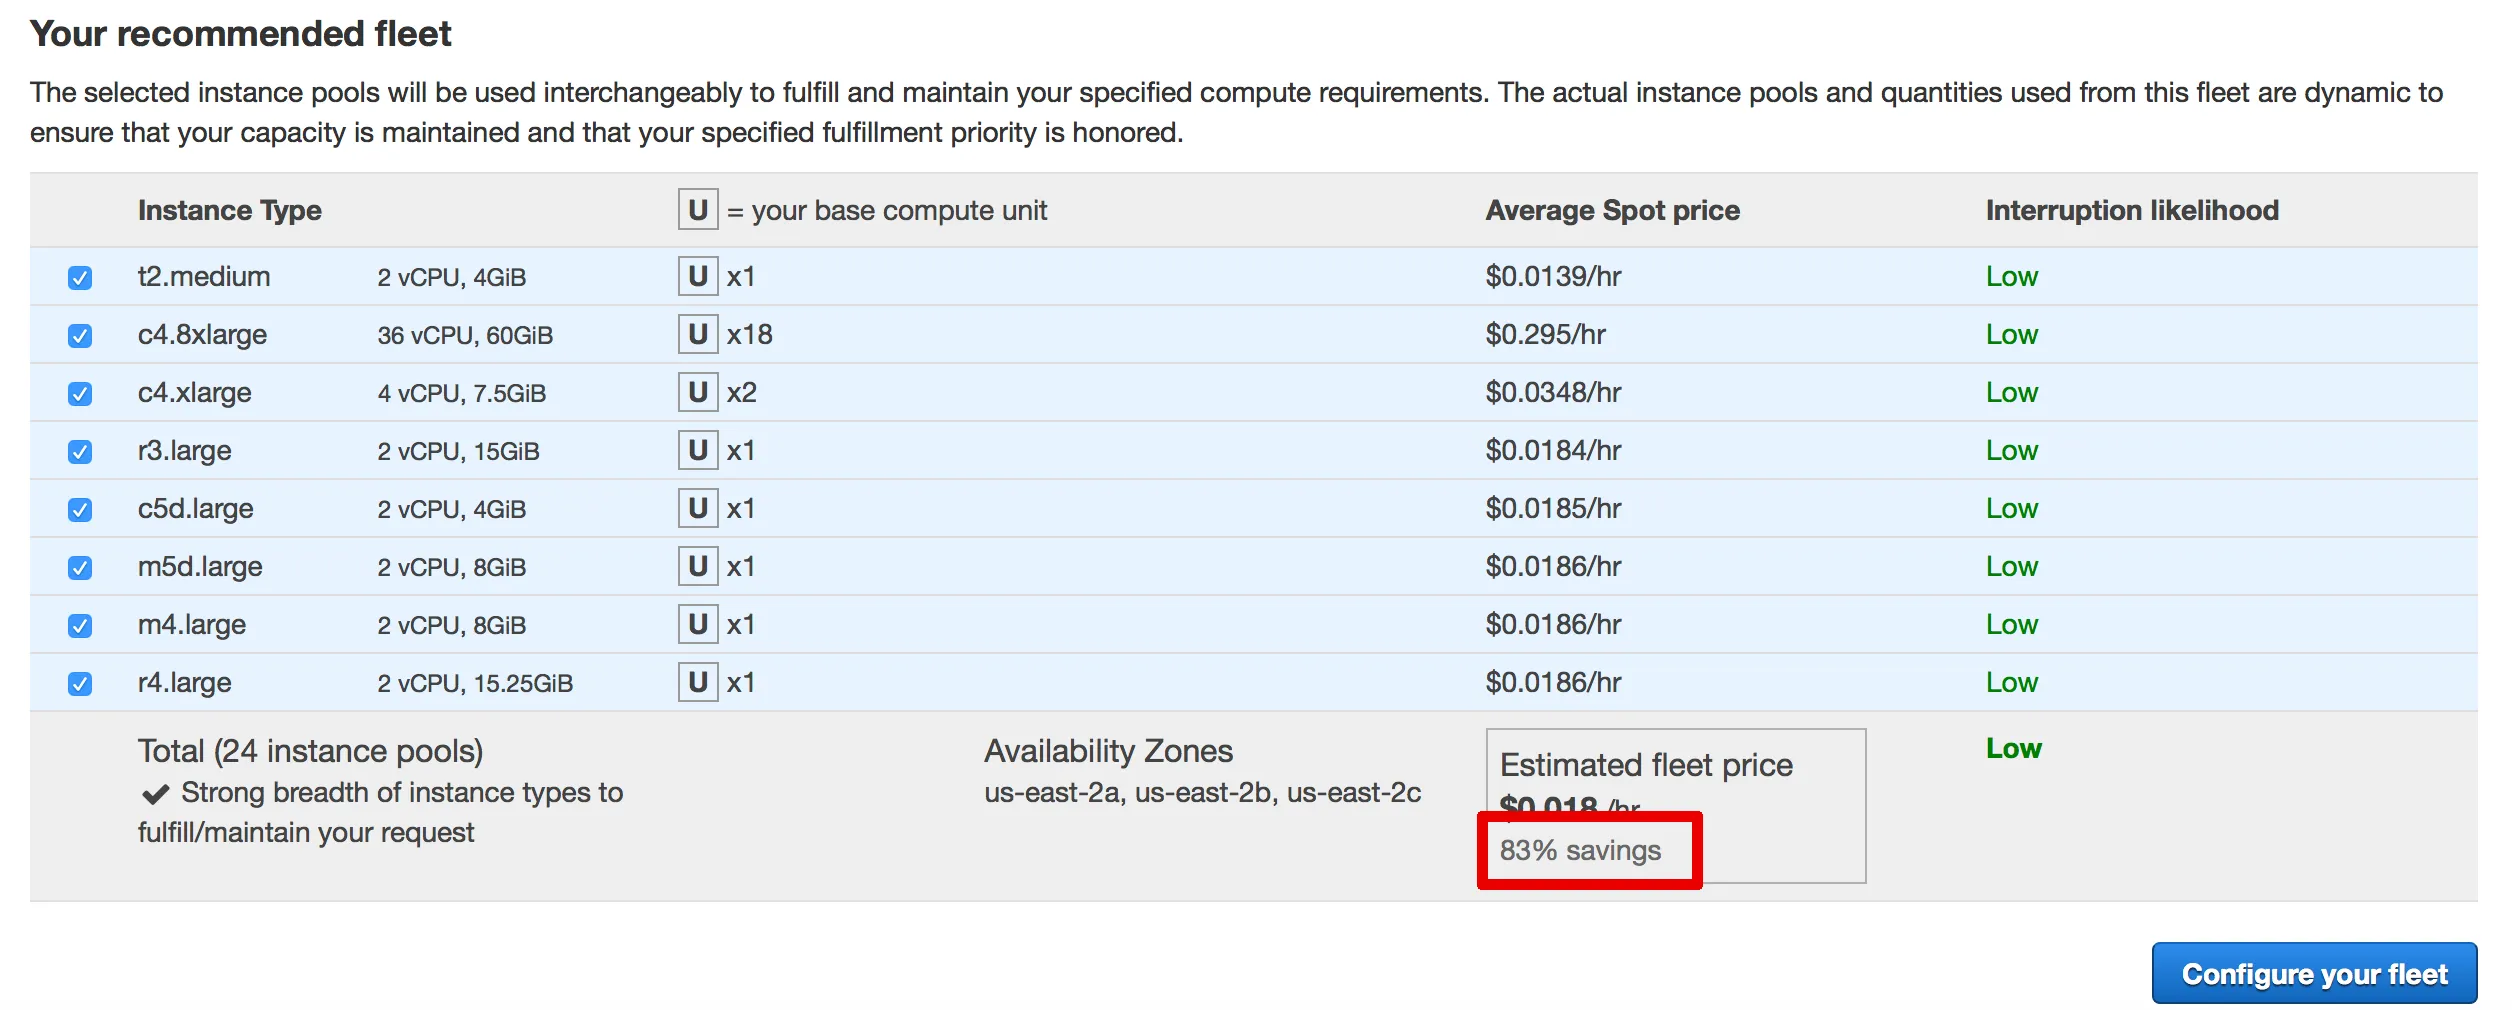
You bid for an ec2 instance with certain specs and, as long as your bid is above the average market price, you have an instance behaving like a classic ec2.If your bid is below the market price you instance is terminated after a short notice. More info on spot instances. We made a spot request, it was fulfilled in no time and then we cloned our repo and installed a python3 virtual env with all the project requirements.
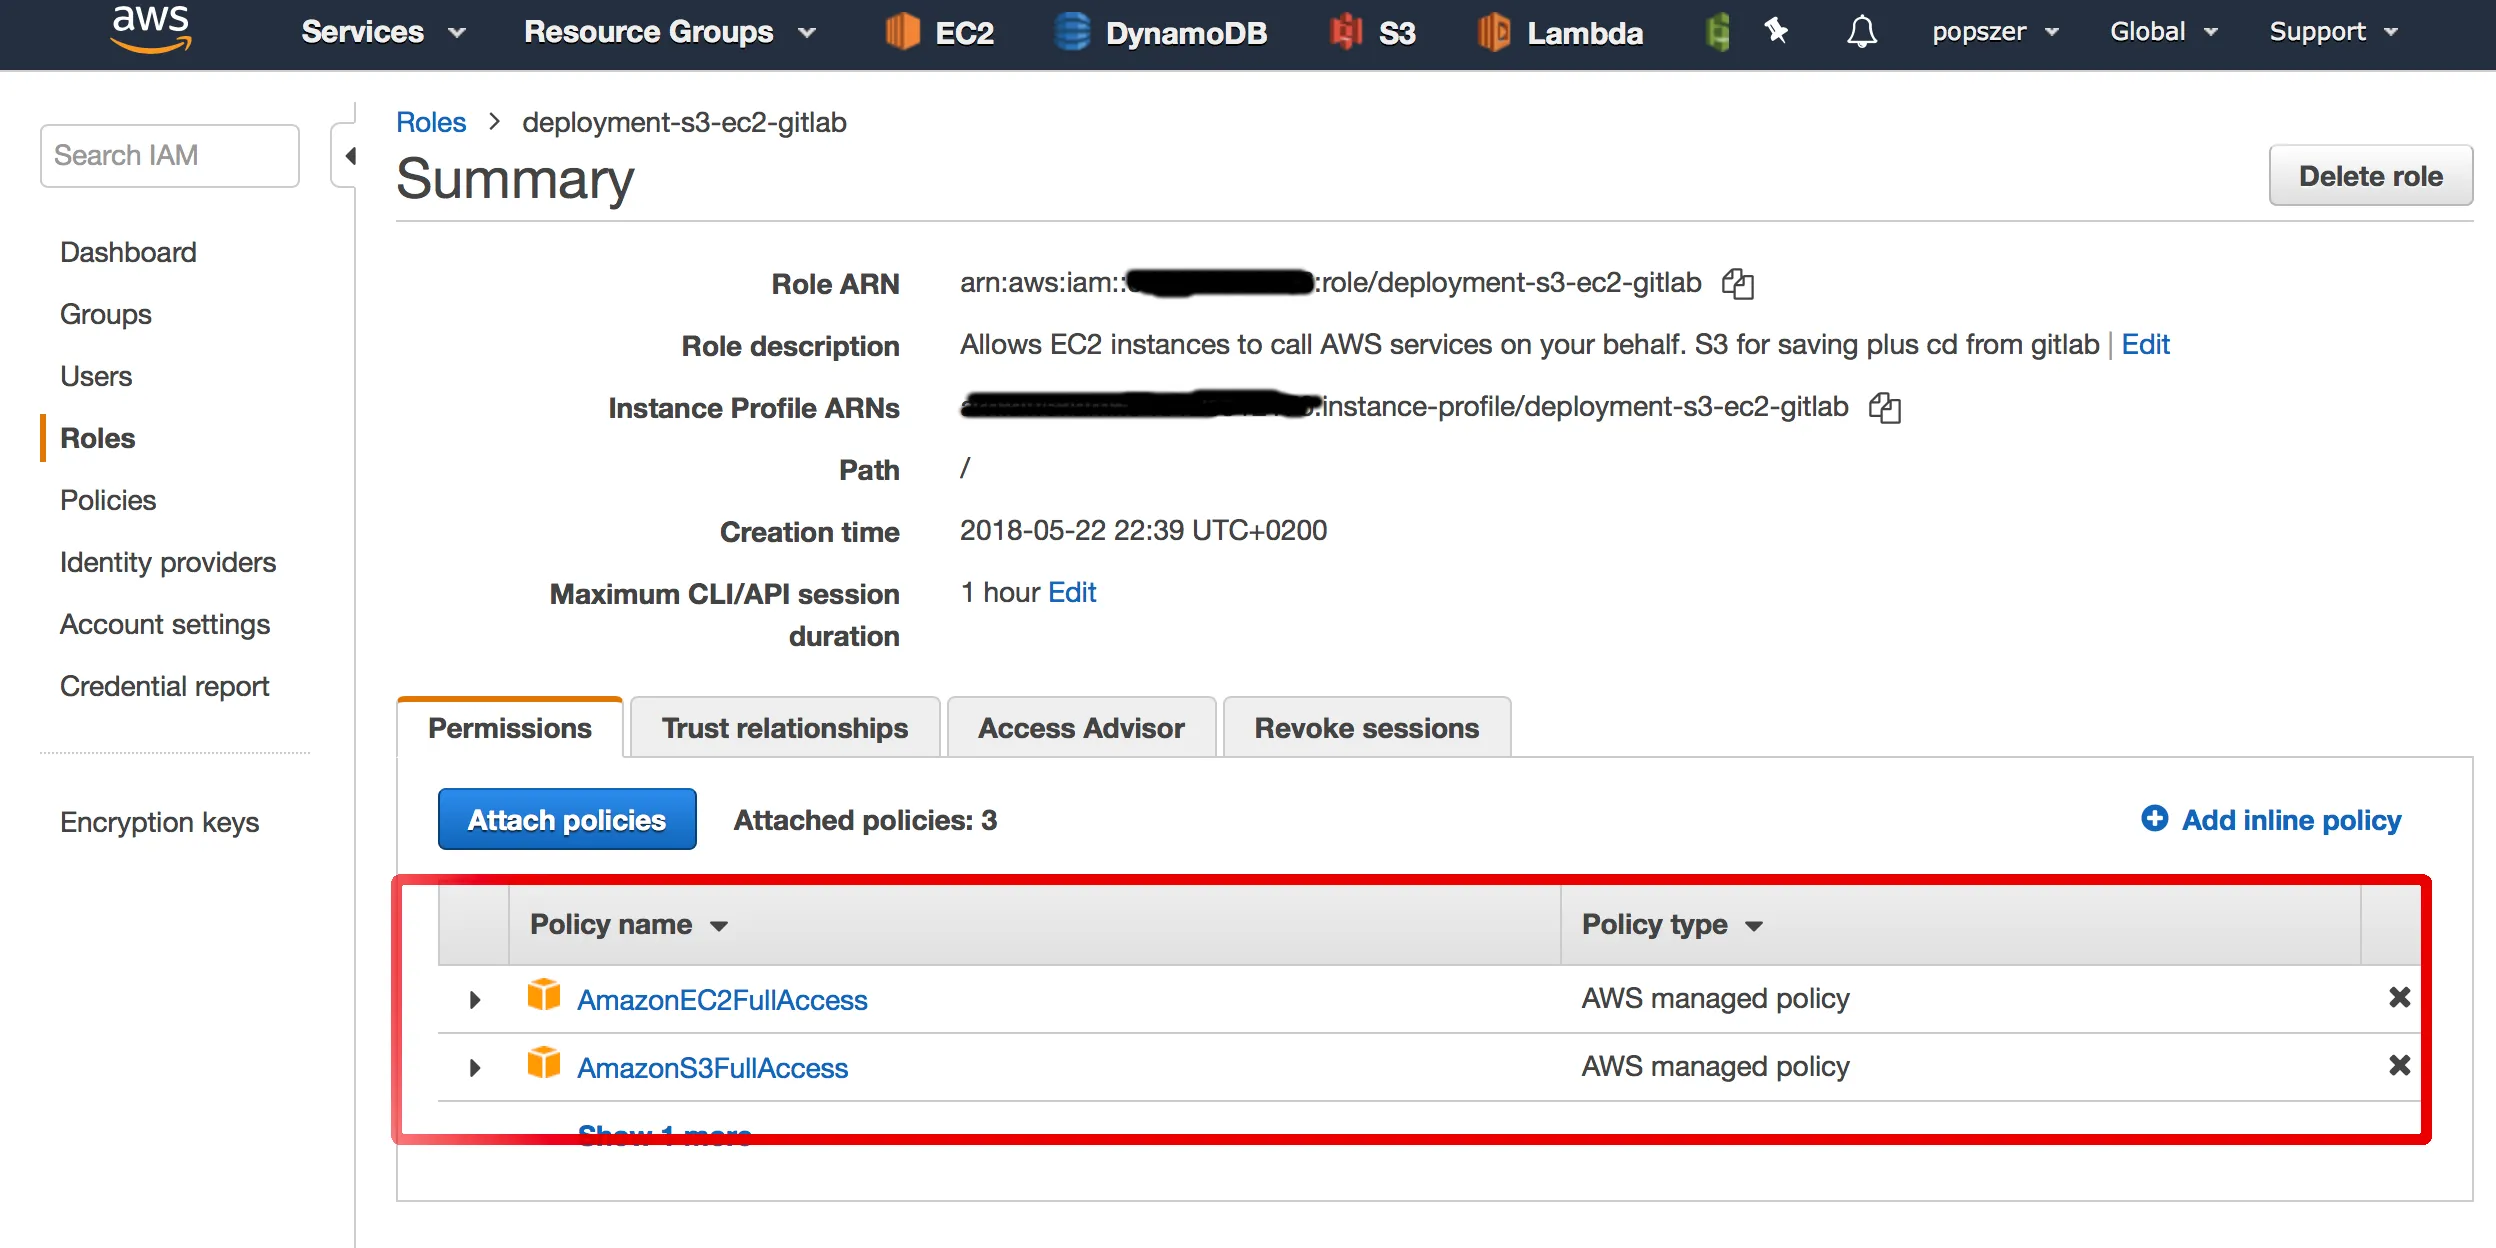
Note: You need to enable your instance to write on s3 bucket if you want to save your model checkpoints (as seen 👇) texgenrnn saves a model checkpoint at each epoch. To cope with the risk of instance termination and save our checkpoints in a safe place, we use aws cli to copy the checkpoints in an aws s3 bucket. cd to your checkpoint files and copy them to your s3 bucket.
# run `pip install awscli` beforehand
aws s3 cp my-checkpoint-file.ckpt s3://my-s3-bucket/model-saves/
3- Serving the text generative model
For the purpose of providing users with better lyrics, we use a custom generation function.

Demo of the call to the API and its response.
4- Plugging in the front end
GitHub repository: RapLyrics-Front
sudo apt-get install apache
/var/www/html/
Remember to update the "url" settings of your endpoint in the index.html
That’s it, you’re done (kind of).
You can now access the website by accessing your server ip in a web browser.
— production set-up
[optional]These are the next steps if you want to have the front-end and back-end on the same machine with a https connection.
- Let’s encrypt our website 🔒 → follow the steps in How To Secure Apache with Let’s Encrypt (Digital Ocean has really awesome tutorials)
- Our
index.htmlserved by apache callsraplyrics.eu/apiUSwhen the user submits an input. In fact, there is no/apiUSroute on apache. We need to redirect this call to the gunicorn server running on this very same machine. This is what is called reverse-proxying.
Go to
/etc/apache2/sites-availableYou should see a
000-default.conf and a 000-default-le-ssl.conf file. They are
template files handling configuration on how apache will serve your http and https (le-ssl)
website.
We make a copy of them for our website. (replace raplyrics.eu with your domain name 👇)
sudo cp 000-default.conf raplyrics.eu.conf
sudo cp 000-default-le-ssl.conf raplyrics.eu-le-ssl.conf
i) Redirect traffic from http to https
Editraplyrics.eu.conf to include the rewrite conditions below:Rewrite rules to redirect traffic from http to https. Remember to replace raplyrics.eu by your site name.
ii) Reverse proxy the API call
Editraplyrics.eu-le-ssl.conf to include the proxy reverse instructions. Reverse proxy to redirect the API call to the gunicorn app
It is here that we handle the proxy pass from
raplyrics.eu/apiUS to the local gunicorn
server at 127.0.0.1:8000
Now we tell apache to update the website configuration:
sudo a2ensite raplyrics.eu.conf
sudo a2ensite raplyrics.eu-le-ssl.conf
systemctl restart apache2 to take the changes into account.
That’s it, you’re in production. 🚀
You can check ours on raplyrics.eu
References
- Interesting blog post on Serving a python app on heroku (Heroku dynos could not handle our app — not enough ram) steps are well described. https://guillaumegenthial.github.io/serving.html
- Reverse proxying on apache2 https://httpd.apache.org/docs/2.4/howto/reverse_proxy.html
- Digital ocean reverse proxying on apache, again Digital Ocean does a much appreciated documentation job, very detailed. https://www.digitalocean.com/community/tutorials/how-to-use-apache-as-a-reverse-proxy-with-mod_proxy-on-centos-7
- Very interesting SO post on How to build a CI / CD pipeline with GitLab and AWS https://stackoverflow.com/questions/38671818/how-to-deploy-with-gitlab-ci-to-ec2-using-aws-codedeploy-codepipeline-s3
- Inspiration for the neural networks parameters fine-tuning https://yippy.com/yp/skymind
- Interesting Cross-Validated post on fine-tuning batch-size training parameter. https://stats.stackexchange.com/questions/153531/what-is-batch-size-in-neural-network?newreg=e96dc96f976b43e0a6a21955daa54498
- Google Brain paper proposing a set of hyper-parameters for a text-generative LSTM (especially the 4. Experiment and 4.1 Language modeling for our use case.) https://arxiv.org/pdf/1409.2329v4